Basic Guide to 3D Printing – Should You Get a 3D Printer?

If you were browsing the Internet in the past couple of years, you might have briefly come across the term 3D printing. It is a very interesting technology that offers a lot of promise and already has a wide range of applications.
It is a technology that paves the way into the sci-fi-like future we all imagine when we get our eyes on some kind of stunning technological breakthrough. 3D printing can change and better our lives in many ways. It will change the way we live our lives, work and play.
Imagine what kind of possibilities does a technology hold, that enables us to shape matter to our imagination? It has already changed and improved many lives with prosthetic legs and body parts, organs and we can even 3D print meat as well.
A lot of people think that the fact that 3D printing is so amazing, means that it has to be very expensive, which is far from the truth. Many people have 3D printers in their home.
Enthusiasts and hobbyists already use this technology to their advantage. Some use it for business purposes and some just for the sheer fun and amazement it offers them.
3D printing can revolutionize commerce, as it can already create a lot of merchandise and an almost endless amount of useful items from a wide range of materials.
It is a technology that is worth looking into for tech enthusiasts or anyone who is interested what kind of technological empowerments the present and future can bring us. So let’s dive into it to grasp this interesting concept!
What is 3D Printing Actually?
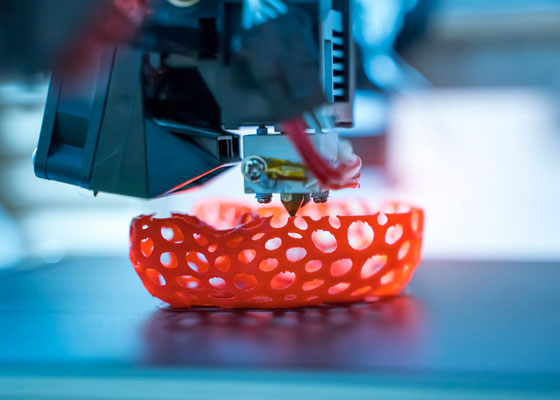
3D printing is also known as additive manufacturing. It is a process used to make solid three-dimensional objects from a computer file.
A 3D printed object is created through various additive processes, which means that the object is created by laying layers on top of each other until the entire object is complete.
These layers are thin horizontal sections of the object we aim to print out.
The 3D Printing Process
It all starts with the creation of a digital file either through a design in CAD software or by scanning the desired object with a 3D scanner. A 3D scanner is able to create a digital copy of the 3D object it scans.
There are a variety of different 3D scanners which use different technologies to capture and generate 3D models. They might use volumetric scanning, modulated light or many other technologies.
- 3D scanning has been enabled for Microsoft Kinect in the recent years. Scanning can be made into a really easy process. We might even have our smartphones do 3D scanning in the future as well. It’s just as easy as taking a photo of the object you want to model. The prices of current 3D scanners can range from highly expensive industrial level scanners to simple $30 DIY (Do It Yourself) homemade scanners.
- 3D modeling software also varies in forms. It can also be high grade industrial software that costs thousands of dollars per license or can be simple free software like Blender. There is much software to choose from when one wants to do 3D printing. The best one to start with so far is Tinkercard, free software that works in browsers that support WebGL, such as Google Chrome. They offer great lessons for beginners and you can easily get your object printed through a number of different 3D printing services.
- Printing from a model is an interesting process. You’ll have to have to use a process called slicing. It is the method of creating a 3D print ready model with software. This preparation process consists of slicing a particular 3D model into hundreds or even thousands of individual horizontal layers. Sometimes you are forced to use particular slicing software for a particular 3D printer. It depends on what kind of hardware you use. Once the slicing is done, it’s time to transfer the model to your 3D printer. Once the printing starts, your object will be printed layer by layer. Each of these layers are read as 2D images and they create a three dimensional object when put on top of each other.
How To Get Started With 3D Printing?
The first thing you have to figure out is what you are most interested in and what would you like to learn first? Would you like to know more about modeling and creating objects or do you want to focus on the hardware and the printing process.
There are a wide variety of pre-assembled 3D printers that you can buy and use. But if you are on a budget, there are also some 3D printer kits which are highly recommended to use.
They can give you a good start and can help you learn a lot. We’ll list some of these kits later in this article.
Applications of 3D Printing
3D printing is used in a huge variety of industrial fields. It enables the creation of architectural scale models, prosthetics and even printing with human tissue. It can also be used for rapid prototyping and offers endless possibilities for entertainment purposes.
Even more interesting examples include the reconstruction of fossils, replacement of ancient archeological artifacts, reconstructing body parts and bones and even damaged evidence on a crime scene. The biggest industries that currently leverage the benefits of 3D printing are the following:
The Aerospace and Aviation Industries
With the growth and deployment of 3D printing technology, aviation industries can also develop further in terms of metal additive manufacturing.
NASA has printed combustion chamber liners by using the selective laser melting technology. It is the first 3D printed jet engine part that took flight.
The Medical Industry
The use of 3D printing technology for medical purposes has been evolving at an extremely rapid speed. Specialists are able to deploy 3D printing in very advanced ways, enabling never before seen results.
Thanks to this, many patients have high tech prosthetic body parts and implants and have much better quality healthcare.
Certain biotech firms are also using inkjet technologies to create organs and body parts. They are exploring various ways to use 3D printing technology for tissue engineering purposes. This kind of 3D printing is called bio-printing.
The Automative Industry
This was the first industry to adopt 3D printing as a form of low cost prototyping application.
Today, as 3D printing has evolved further, they are able to create various concept models and even functional parts that are used to test engines and vehicles.
Personal 3D Printing
Domestic 3D printing or Personal 3D Printing is mainly for enthusiasts. The concept started evolving in 2011 and was set on a road of rapid development as printers are getting cheaper.
Today, you can get your hands on a 3D printer from $300 to $3000. Thanks to this, more and more people can get their hands on 3D printers.
How Do You Get Started?
It’s one of the biggest misconceptions that it is very expensive to do 3D printing. Even if you are on a tight budget, you can start printing, because there are many cheap 3D printer kits that are a great way to start.
When starting your journey with 3D printing, it’s a good idea to assemble the kit you buy yourself, so you’ll grasp the idea of how 3D printers function.
By following the instructions that are provided with your kit, you’ll learn all the terms that are necessary to solve any problems that might arise in a later stage.
They say that it’s really easy to build a 3D printer today. You just have to connect a few screws, parts and cables. It takes about 4-16 hours to assemble a 3D printer kit, depending on your current knowledge.
Now let’s see what kind of 3D printer kits you can get your hands on if you’re on a budget.
Cheap 3D Printing Kits
These kits can be bought for a few hundred dollars. Each of them is great for beginners who wish to learn 3D printing.
Prusa 3D Printer i3 DIY Kit
The Prusa 3D Printer i3 DIY Kit has a full acrylic frame that supports a multitude of materials such as: Flexible PLA, PLA, Wood, HIPS, Nylon, CopperFill, ABS and Polycarbonate.
It comes with an MK8 extruder and has a 210 x 210 x 215 mm build volume. It has a printing speed of 100mm/s, a 1.1-0.4 mm layer thickness and a layer resolution of 100 microns.
The kit also includes an MK3 heated bed and a 2004 LCD screen.
FLSUN 3D Metal Frame Prusa i3 DIY KIT
The FLSUN 3D Metal Frame Prusa i3 DIY KIT comes with a strong metal structure that brings more stability and provides much more accuracy.
The i3 model has a better solution for limiting switch position and is much easier to control and adjust.
It is compatible with multiple materials such as: ABS, PETG, PLA, PVA, Wood and Flexible Filaments. It has a build volume of 200 x 200 x 200 mm.
Tarantula 3D Slimbot DIY Kit
The Electron 3D Slimbot or TEVO Tarantula features the Pursa i3 design that has tens of thousands of users all around the world.
This 3D printer has a build volume of 200 x 200 x 200 mm but you can upgrade it to 200 x 280 x 200 mm for extra cost.
It also has a heated bed and an MK3 integrated aluminum plate. You can also add automatic height detection and leveling to the kit, which comes at extra cost.
Summary
This concludes our journey into the world of 3D printing. We covered the very basics of this immense technology and there is a lot more to talk about, which we might do in one of our upcoming articles.
In a best case scenario, we managed to spark your interest and you yourself will start using a 3D printer soon. We hope that you found this article interesting and informational and that we will see you in the next one!


